1. Introduction
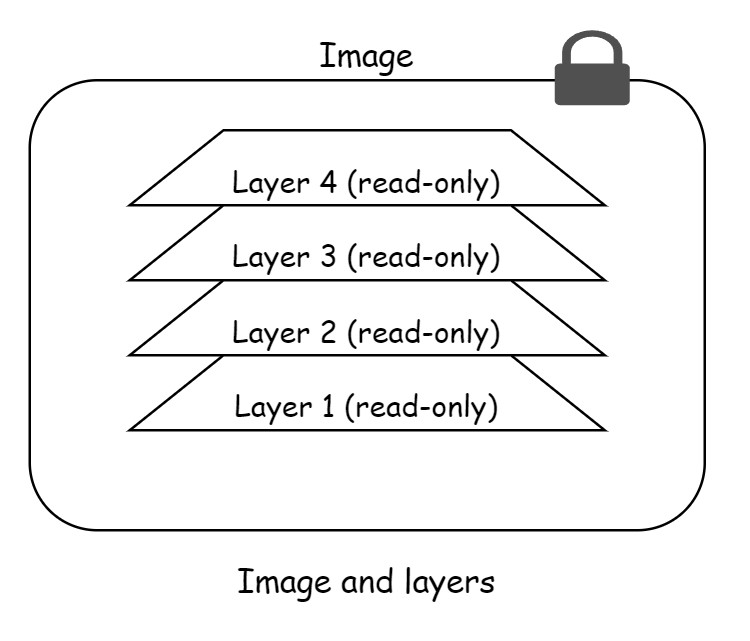
A Docker image is a collection of loosely-connected read-only layers where each layer comprises one or more files. Figure 6.3 shows an image with 4 layers.
The best way to see images is when you pull an image. Let us see an example.
C:\>docker pull redis:latest
latest: Pulling from library/redis
302e3ee49805: Pull complete
5d0249d9189d: Pull complete
4825c5e95815: Pull complete
b0ce50685fa2: Pull complete
455886c7d31b: Pull complete
96377887d476: Pull complete
4f4fb700ef54: Pull complete
5fac73c23c9b: Pull complete
Digest: sha256:b5e0821350e8d5880450c0264f29ac0395fab3f46204fe43a1f6a8da8c1f8572
Status: Downloaded newer image for redis:latest
docker.io/library/redis:latest
Each line in the output above that concludes with “Pull complete” corresponds to a layer in the image that was downloaded. We can see the layer IDs in the output.
You can use docker inspect <image-name> to see the image layers. Following is the trimmed output of docker inspect.
C:\>docker inspect redis:latest
................
        "RootFS": {
            "Type": "layers",
            "Layers": [
                "sha256:8d853c8add5d1e7b0aafc4b68a3d9fb8e7a0da27970c2acf831fe63be4a0cd2c",
                "sha256:6f55c091a2963d515906f632c586081f9c23a26b264a260cc00d1bd53e1dd36a",
                "sha256:2327eaf97ccef3360aa28110cefdb801ab144255042d13fe665cf47e7f9f70d4",
                "sha256:a71dbd37c9b50b89c4bcf54dd9228091e42a78c0f94233b585ee126ad73d3e2f",
                "sha256:fa65e4be9d35013da255bb117ac83472873f134406e2437904c8dfc11a59d02c",
                "sha256:5c6b18089c89c0084be87ad95e96f5fbdf310bc1fde4b0b458411e23d5036cb7",
                "sha256:5f70bf18a086007016e948b04aed3b82103a36bea41755b6cddfaf10ace3c6ef",
                "sha256:2f1dc4a31b6f9c99b7ab8d2b16db594f89a92efe340e166dc9b7c47750fc9826"
            ]
        },
The output shows 8 layers. But here the output is showing SHA256 hashes.
2. Understanding image layers
A docker image starts with a base layer. As and when changes are made to the image and new content is added to it, a new layer is created. Here is a simplified version of a Java application.
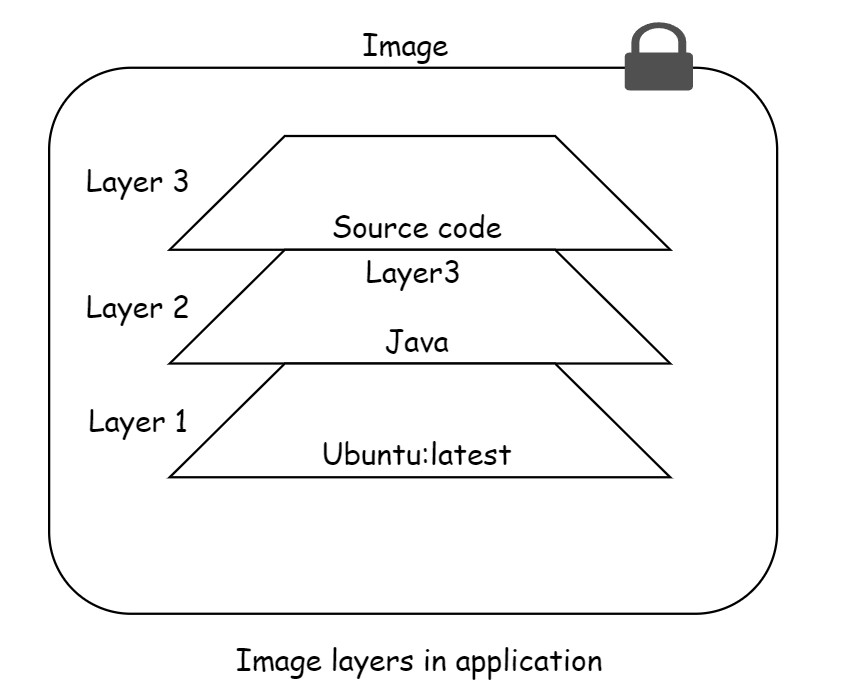
Here, ubuntu is the base layer. When Java is added then it creates another layer. Adding source code to the application, will add another layer. The final image will consist three layers. It’s important to recognize that as more layers are added, the image consists of all layers stacked together in the sequence they were created.
Let us see another example with files in images.
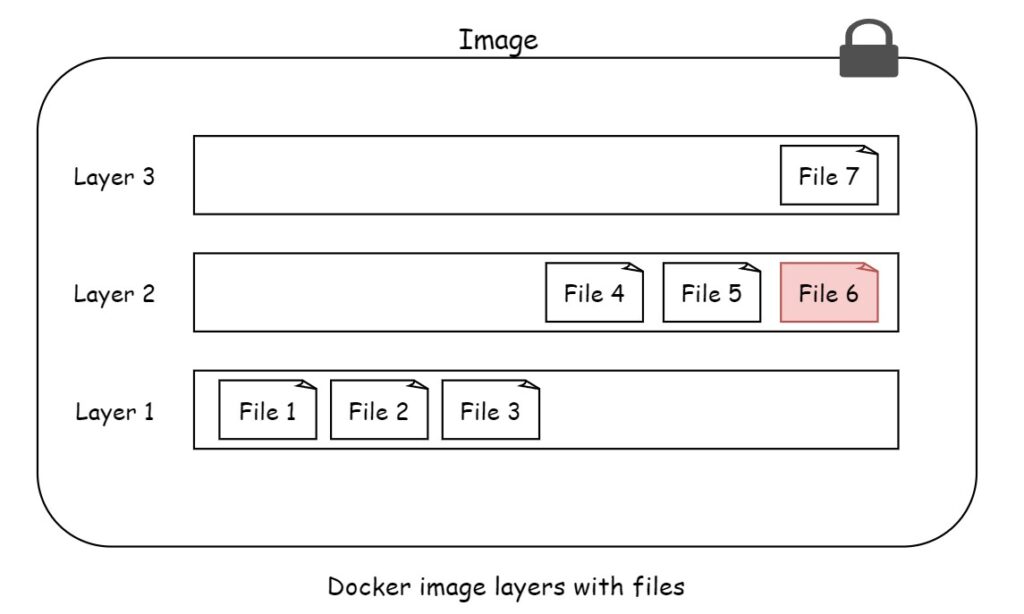
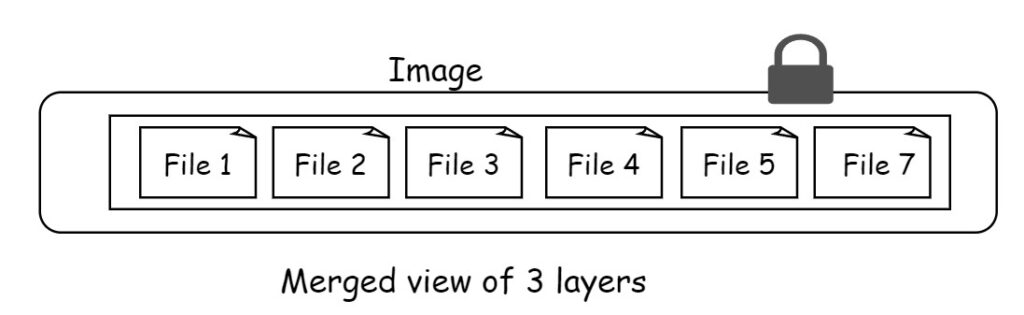
In the end overall image there are 6 files. This is because the File 7 is the updated version of File 6. File 7 obscures the File 6 in layer 2. This allows adding updated files in new layers.
3. Storage driver
In Docker, the storage driver is a critical component responsible for managing how the image layers are stacked and presented as a unified, writable filesystem. This allows Docker to efficiently manage container images and their layers, ensuring that changes made to a running container don’t directly affect the base image. Instead, modifications are written to the top-most layer, leaving the underlying layers intact.
3.1 How Storage Drivers Work
When you create or run a container, Docker uses a storage driver to combine multiple read-only image layers with a writable layer on top. This allows containers to make changes to the filesystem without altering the base image. Changes made during a container’s lifecycle are stored in this writable layer, which is specific to that container.
When the container is deleted, only the writable layer is removed, while the underlying read-only image layers remain intact and can be reused by other containers, making Docker highly efficient in terms of storage.
Few common storage drivers are overlay2, devicemapper, btrfs, zfs. No matter which storage driver is used, the user experience is the same.
4. Sharing image layers
Docker image layers are designed to be shared across multiple images and containers to optimize storage and improve performance. This mechanism allows Docker to reuse common layers between different images, avoiding duplication and making the process of pulling, storing, and building images more efficient.
4.1 How Docker Image Layer Sharing Works
Layering Concept: Docker images are composed of multiple read-only layers, each representing a change in the filesystem, such as adding a file or installing software. These layers are created sequentially during the build process, typically through instructions in a Dockerfile (e.g., RUN, COPY, ADD commands).
Content-Addressable Storage: Each layer is identified by a unique digest (hash), which represents its contents. If two images contain a layer with the same hash, Docker stores that layer only once on the host system, and multiple images can reference it.
4.2 Layer Reuse
Image Pulling: When you pull an image, Docker checks if any of its layers already exist on your local system. If so, it skips downloading those layers and only pulls the layers that are missing.
Building Images: During the build process, Docker can reuse cached layers if the previous commands in the Dockerfile haven’t changed. This significantly speeds up the build process by skipping steps where the results are already available.
Shared Layers Across Containers: When you start multiple containers from the same image, Docker doesn’t duplicate the image’s read-only layers. Instead, each container shares the same layers, and Docker creates a writable layer specific to each container where changes are stored. This means that hundreds of containers can be based on the same image without consuming additional space for the base layers.
Layer Sharing Across Images: If you have different images that share some common instructions in their Dockerfiles (e.g., using the same base image like ubuntu:latest), Docker will store those shared layers only once. This is especially useful for images that are based on the same operating system or environment.
5. Image squashing
Image squashing in Docker refers to combining multiple layers of a Docker image into a single layer. This can help reduce the size of the final image and improve performance, particularly by minimizing redundant data. Squashing is useful when you have many intermediate layers and want to streamline the image before distribution.
5.1 Why Use Image Squashing?
- Reduce Image Size: By eliminating unnecessary intermediate layers, squashing can help shrink the overall size of the image.
- Improve Performance: Fewer layers can lead to better performance when pulling, pushing, or transferring images between environments.
- Remove Intermediate Files: Sometimes, temporary files or build artifacts get created in early layers and deleted in later layers, but they still exist in the image. Squashing helps remove them.
5.2 How to Use Image Squashing in Docker
Docker provides an option to squash images at build time using the --squash flag, but it’s important to note that squashing is not enabled by default. Here’s how to do it:
Squashing an Image:
Enable Experimental Features: Squashing is an experimental feature in Docker, so it must be enabled. You can enable it by setting “experimental”: “enabled” in the Docker daemon configuration (/etc/docker/daemon.json).
Example daemon.json configuration:
{
  "experimental": true
}
Run Docker Build with Squash: Once experimental features are enabled, you can use the --squash flag when building an image.
docker build --squash -t my-squashed-image .
Docker will combine all layers into a single layer (excluding the base image layer). The result is a smaller, more optimized image.
5.3 Pros and Cons of Squashing
Pros:
- Reduced Image Size: Squashing can reduce the size of your image by eliminating intermediate files and artifacts.
- Simpler Image Structure: Fewer layers make the image simpler and more efficient to handle.
- Security: Sensitive data that was removed in later layers is completely erased, reducing potential security risks.
Cons:
- Loss of Layer Caching: Squashing combines layers, which means Docker’s layer caching mechanism is no longer as effective for future builds.
- Less Granularity: You lose the ability to inspect and troubleshoot individual layers.
- Build Time: Squashing can increase build time because Docker has to reprocess the layers.
5.4 When to Use Image Squashing
- When the final image size is a priority (for example, in production environments or with images being distributed to many users).
- When there are many intermediate steps or temporary files in the Docker build process that are no longer needed in the final image.
- When you need to ensure that sensitive data has been completely removed from the image.
In summary, image squashing is a useful technique to reduce the size of Docker images by collapsing multiple layers into one, improving performance, and ensuring that unnecessary data is removed.
6. Conclusion
Docker images are built from layers, with each layer representing a snapshot of the filesystem at different stages of the build process. These layers make images more efficient by enabling reuse, as multiple images can share common layers. Understanding how Docker stacks and manages these layers is crucial for optimizing build processes, reducing redundancy, and saving storage space. By leveraging layer sharing and keeping images lightweight, you can ensure faster pulls, builds, and deployments, ultimately improving the performance and scalability of your containerized applications.