Introduction
NodePort Services in Kubernetes operate on high port numbers ranging from 30000 to 32767. To access your application externally, you need to know the Node’s IP address or hostname along with the port number. This setup is often impractical in production environments, especially when dealing with multiple applications or dynamic infrastructure.
LoadBalancer Services solve this problem by automatically provisioning a cloud load balancer for each Service. This means that every internet-facing application will get its own dedicated external IP address, eliminating the need to manually map IPs and ports. However, this approach has some drawbacks:
- 1:1 Mapping: Each Service requires a separate cloud load balancer, leading to increased costs.
- Limited Resources: Cloud providers may impose limits on the number of load balancers you can provision.
- High Cost: Provisioning multiple cloud load balancers, especially for large clusters, can become very expensive.
Ingress Controllers offer a more efficient solution by consolidating external traffic through a single cloud load balancer. Instead of creating a separate load balancer for each Service, Ingress uses host-based or path-based routing to direct incoming traffic to the appropriate Service within the cluster. This significantly reduces costs, simplifies management, and provides centralized control for routing rules.
For example:
- Requests to example.com/app1 can be routed to Service A (App1).
- Requests to example.com/app2 can be routed to Service B (App2).
The Ingress Controller typically exposes a LoadBalancer Service on standard HTTP (port 80) or HTTPS (port 443), and manages traffic distribution internally. This makes Ingress a highly efficient and cost-effective approach for exposing multiple applications in Kubernetes.
Note: If you plan to run a service mesh, you may not need Ingress.
Ingress Architecture
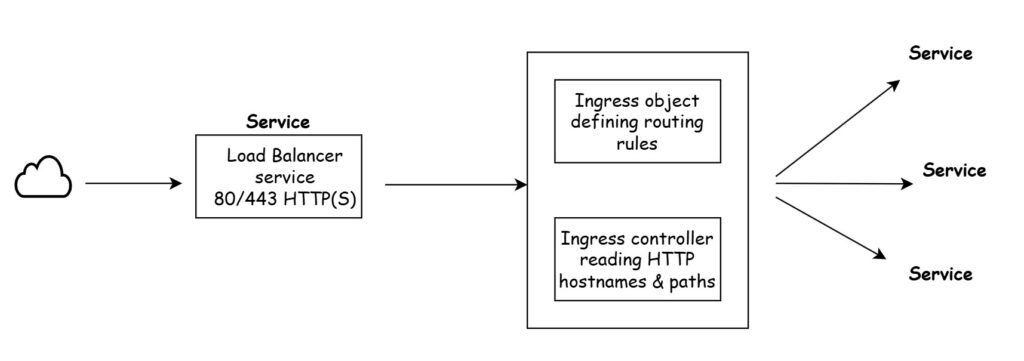
In Kubernetes, Ingress is an API object defined in the networking.k8s.io API group (v1) that manages external access to services within a cluster. It primarily focuses on HTTP and HTTPS traffic routing and is built around two key components:
- Ingress Controller – The component responsible for processing and enforcing traffic routing rules defined in the Ingress resource.
- Ingress Object (Spec) – A configuration that defines the routing rules, such as directing traffic to different services based on hostnames, paths, or protocols.
The Ingress Controller acts as a reverse proxy, reading the rules from the Ingress object and directing incoming traffic to the appropriate backend service.
Ingress Controller vs Built-in Controllers
Unlike standard Kubernetes objects like Deployments or ReplicaSets that come with built-in controllers, Ingress typically does not have a pre-configured controller in most self-managed Kubernetes clusters. This means you need to manually install and configure an Ingress Controller (like NGINX Ingress Controller, Traefik, or HAProxy) to make Ingress work.
However, some hosted Kubernetes platforms (such as Google Kubernetes Engine – GKE) come with a pre-installed Ingress Controller, simplifying the setup. Without an Ingress Controller, deploying an Ingress object alone will have no effect.
Layer 7 Routing (Application Layer)
A key feature of Ingress is that it operates at Layer 7 (Application Layer) of the OSI model. This means it has deep visibility into HTTP requests, allowing it to make routing decisions based on:
- Hostnames: Route traffic based on domain names (e.g.,
app1.example.com,app2.example.com). - Paths: Route traffic based on URL paths (e.g.,
/app1,/app2). - HTTP Headers: Inspect incoming requests and route traffic accordingly.
For example:
- Traffic to
example.com/app1could be routed to Service A. - Traffic to
example.com/app2could be routed to Service B.
Example of Host-Based and Path-Based Ingress Mapping
| Ingress Type | Host/Path | Target Service | Description |
|---|---|---|---|
| Host-Based Routing | app1.example.com | service-app1 | Requests to app1.example.com are forwarded to service-app1. |
| app2.example.com | service-app2 | Requests to app2.example.com are forwarded to service-app2. | |
| Path-Based Routing | example.com/app1 | service-app1 | Requests to example.com/app1 are forwarded to service-app1. |
| example.com/app2 | service-app2 | Requests to example.com/app2 are forwarded to service-app2. | |
| Combined (Host + Path) | app1.example.com/api/v1/ | service-api-v1 | Requests to app1.example.com/api/v1/ are forwarded to service-api-v1. |
| app1.example.com/api/v2/ | service-api-v2 | Requests to app1.example.com/api/v2/ are forwarded to service-api-v2. | |
| Default Backend | any undefined path/host | service-default | Any unmatched traffic is routed to service-default (optional configuration). |
In summary, Ingress exposes multiple ClusterIP Services through a single cloud load-balancer. You create and deploy Ingress objects that are rules governing how traffic reaching the load-balancer is routed to backend
Services. The Ingress controller, which you usually have to install yourself, uses hostnames and paths to make intelligent routing decisions.
Example
In this example, we’ll do the following:
- Deploy two simple applications (
app1andapp2). - Expose both applications using a single Ingress via different paths:
/app1→ app1-service/app2→ app2-service
- Access both applications from a single IP with different URL paths.
Create a folder structure like this:
kubernetes-ingress-example
│
├── app1
│   ├── deployment.yaml
│   ├── service.yaml
│
├── app2
│   ├── deployment.yaml
│   ├── service.yaml
│
├── ingress.yaml
Step 1: Deploy Application 1 (app1)
Create the following files inside the app1 folder:
app1/deployment.yaml
apiVersion: apps/v1
kind: Deployment
metadata:
  name: app1-deployment
spec:
  replicas: 2
  selector:
    matchLabels:
      app: app1
  template:
    metadata:
      labels:
        app: app1
    spec:
      containers:
      - name: app1
        image: hashicorp/http-echo:0.2.3
        args:
        - "-text=Hello from App1"
        ports:
        - containerPort: 5678
app1/service.yaml
apiVersion: v1
kind: Service
metadata:
  name: app1-service
spec:
  selector:
    app: app1
  ports:
  - port: 80
    targetPort: 5678
Step 2: Deploy Application 2 (app2)
Create the following files inside the app2 folder:
app2/deployment.yaml
apiVersion: apps/v1
kind: Deployment
metadata:
  name: app2-deployment
spec:
  replicas: 2
  selector:
    matchLabels:
      app: app2
  template:
    metadata:
      labels:
        app: app2
    spec:
      containers:
      - name: app2
        image: hashicorp/http-echo:0.2.3
        args:
        - "-text=Hello from App2"
        ports:
        - containerPort: 5678
app2/service.yaml
apiVersion: v1
kind: Service
metadata:
  name: app2-service
spec:
  selector:
    app: app2
  ports:
  - port: 80
    targetPort: 5678
Step 3: Deploy Both Applications
Now deploy both applications using kubectl apply:
kubectl apply -f app1/deployment.yaml
kubectl apply -f app1/service.yaml

kubectl apply -f app2/deployment.yaml
kubectl apply -f app2/service.yaml
Step 4: Create an Ingress Resource
Now we’ll create a single Ingress resource that will route traffic based on the path.
Create the ingress.yaml file in the root folder.
ingress.yaml
apiVersion: networking.k8s.io/v1
kind: Ingress
metadata:
  name: example-ingress
spec:
  ingressClassName: nginx
  rules:
  - http:
      paths:
      - path: /app1
        pathType: Prefix
        backend:
          service:
            name: app1-service
            port:
              number: 80
      - path: /app2
        pathType: Prefix
        backend:
          service:
            name: app2-service
            port:
              number: 80
Step 5: Apply the Ingress
Apply the Ingress using:
kubectl apply -f ingress.yaml
Step 6: Expose the Ingress
If you are using Minikube, you need to enable the Ingress Controller.
minikube addons enable ingress
Then, get the Minikube IP:
minikube ip
Suppose the IP is 192.168.49.2, you can now access:
- https://192.168.49.2/app1 → Hello from App1
- https://192.168.49.2/app2 → Hello from App2
Step 7: Verify the Ingress
Check the Ingress with:
kubectl get ingress
Output:
NAME              CLASS   HOSTS   ADDRESS         PORTS
example-ingress   nginx    *       192.168.49.2   80
Step 8: Test the Application
Now access your applications in the browser or using curl:
curl https://192.168.49.2/app1
curl https://192.168.49.2/app2
Use Host-Based Routing
If you want to use host-based routing (like app1.example.com and app2.example.com), modify your Ingress like this:
ingress.yaml (host-based routing)
apiVersion: networking.k8s.io/v1
kind: Ingress
metadata:
  name: example-ingress
spec:
  ingressClassName: nginx
  rules:
  - host: app1.example.com
    http:
      paths:
      - path: /
        pathType: Prefix
        backend:
          service:
            name: app1-service
            port:
              number: 80
  - host: app2.example.com
    http:
      paths:
      - path: /
        pathType: Prefix
        backend:
          service:
            name: app2-service
            port:
              number: 80
But to access it, you’ll need to modify your /etc/hosts file like this:
192.168.49.2  app1.example.com
192.168.49.2  app2.example.com
Then you can access:
https://app1.example.com → App1
https://app2.example.com → App2