Introduction
In this tutorial, we’ll setup the single-node Kubernetes cluster with Docker Desktop.
Step 1: Install Docker Desktop
Docker Desktop is the easiest way to get Docker, Kubernetes, and kubectl on your laptop. At the time of writing this tutorial, Docker Desktop can be downloaded from the following link:
https://www.docker.com/products/docker-desktop/
Windows users should install the WSL 2 subsystem when prompted. After the installation, you may need to start the app manually. While running Windows users get the whale in the system tray at the bottom.
Open a terminal and run the following commands to ensure Docker and kubectl are installed and working.
> docker --version
Docker version 24.0.5, build ced0996

> kubectl version --client=true -o yaml
clientVersion:
  buildDate: "2023-05-17T14:20:07Z"
  compiler: gc
  gitCommit: 7f6f68fdabc4df88cfea2dcf9a19b2b830f1e647
  gitTreeState: clean
  gitVersion: v1.27.2
  goVersion: go1.20.4
  major: "1"
  minor: "27"
  platform: windows/amd64
kustomizeVersion: v5.0.1
Step 2: Enable Docker Desktop’s built-in Kubernetes cluster
Click the Docker whale icon in your menu bar or system tray and choose the Settings option.
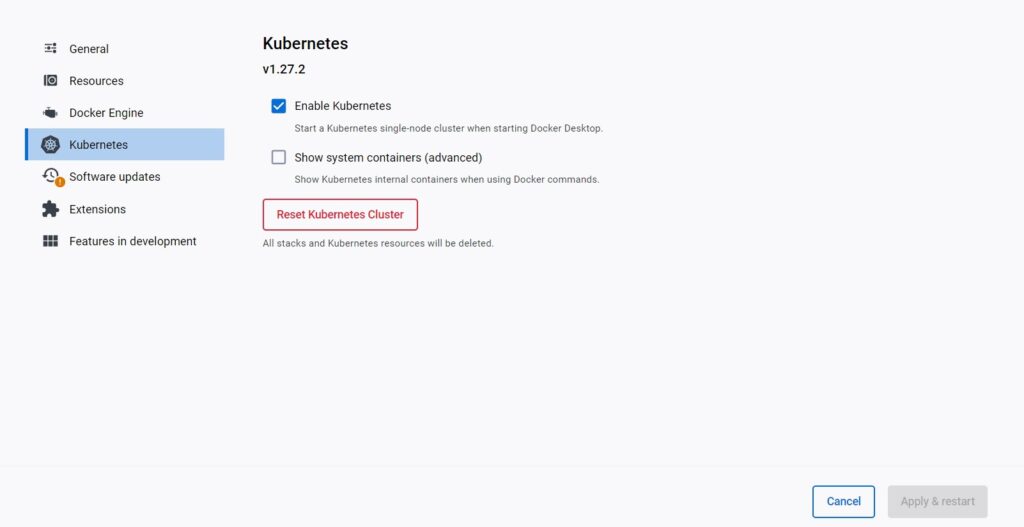
Select Kubernetes from the left navigation bar, check the Enable Kubernetes option, and click Apply & restart.

It’ll take a minute or two for Docker Desktop to pull the required images and start the cluster. The Kubernetes icon in the bottom left of the Docker Desktop window will turn green when the cluster is up and running.
Step 3: Test your cluster
Run the following command to ensure the cluster is up and running and your kubectl context is set.
> kubectl get nodes
NAME             STATUS   ROLES           AGE   VERSION
docker-desktop   Ready    control-plane   50m   v1.27.2
