1. Introduction
In this tutorial, we’ll learn how to configure a new OAuth client application in Keycloak. We’ll then see how to configure client application secrets. We’ll then use the new credential to perform authorization code flow.
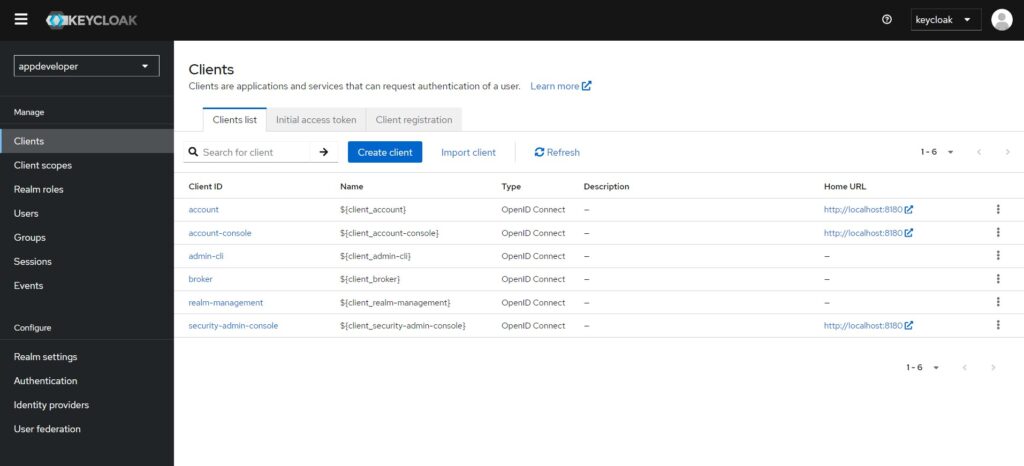
2. Configure new OAuth client application
We’ll now see how to configure a new OAuth client.
- Log in to Keycloak server with admin user name and password.
- Select the realm for which you want to create client application.
- Go to the ‘Clients’ section.
In the ‘Create Client’ form, we have two options, OpenID Connect and SAML. OpenID Connect allows Clients to verify the identity of the End-User based on the authentication performed by an Authorization Server. SAML enables web-based authentication and authorization scenarios including cross-domain single sign-on (SSO) and uses security tokens containing assertions to pass information. OpenID Connect protocol adds additional token that is called ID token. This token contains user’s identity data in a Json format. This protocol is mainly used in web and mobile applications which need to authenticate users and access their profile information.
SAML is a protocol that is independent of OAuth. It uses XML as data format. SAML is feature rich and mainly used for enterprise and government applications that need to authenticate users and access more complex identity data.
- For this tutorial, we’ll select ‘OpenID Connect’ as ‘Client type’.
- The next field is ‘Client ID’. We’ll name it as
my-app-code-flow-client. We’ll provide only these two fields and will move to the next section. - In the ‘Capability Config’ section, ‘Client auhentication’ toggle is off. This means that for the created client will be public. This means that for this client no client secret value is generated. A client secret is used by the application to prove its identity. The client secret needs to be stored safely. This toggle button should be off if the application can not store the client secret safely. An example of such application is a JavaScript application that runs in a browser window. Anyone can view its source code and hence the client secret.
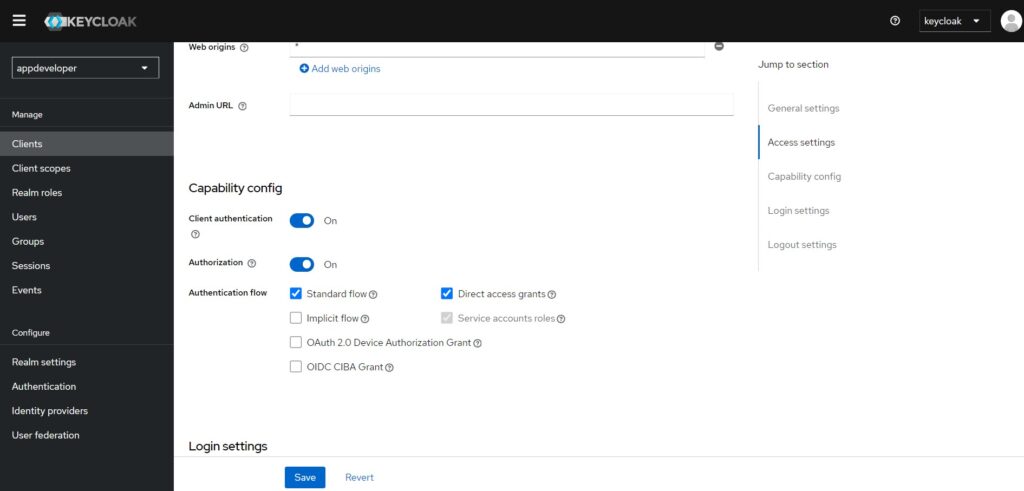
- The next configuration option is ‘Authorization’. Using this configuration allows you to define and enforce authorization policies using scopes and permissions. In this tutorial, we’ll use the scope based access control so we’ll on this toggle.
- The next configuration is ‘Authentication flow’. The ‘Standard flow’ enables standard OpenID Connect redirect based authentication with authorization code, which is called Authorization Code Flow. When the ‘Direct access grants’ is selected it means the client has access to username and password of a user to exchange it directly with Keycloak server for access token.

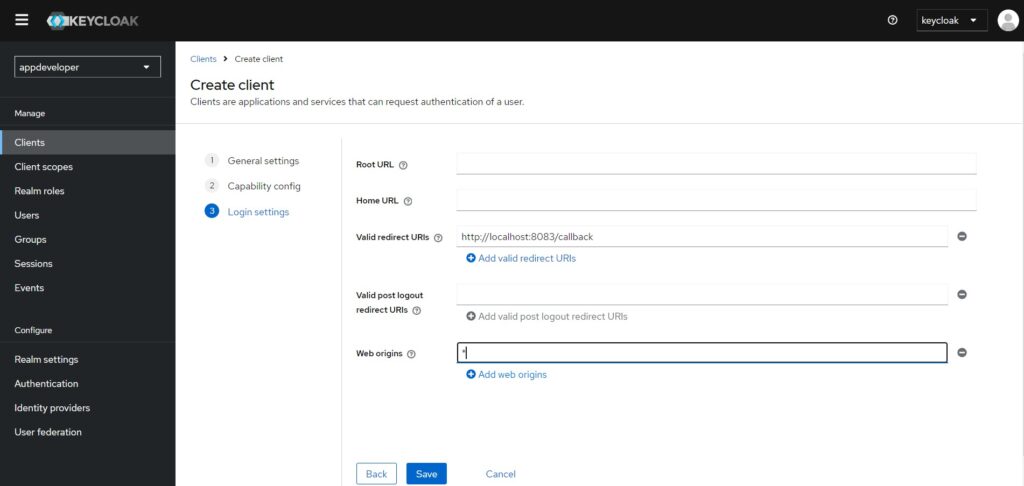
- Click on the ‘Next’ button. The next section is ‘Login settings’. On this page we can configure login settings for the client. The first configuration option is ‘Root URL’. In this tutorial, we’ll only configure the ‘Valid redirect URIs’ to the value ‘https://localhost:8083/callback’. The next configuration option is ‘Web origins’. This is used to allow scripts to access resources from other origins that use a different domain names.
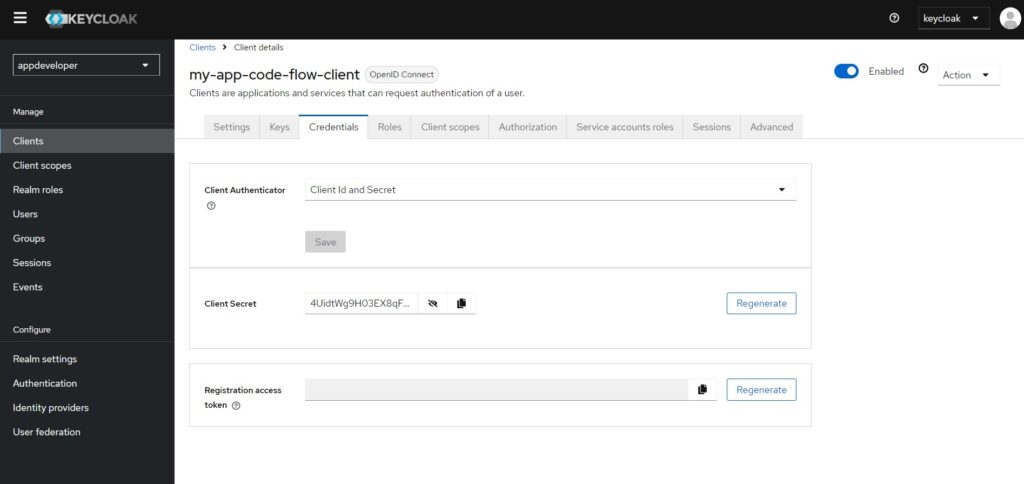
3. Client Application Secret
You can copy the Client Secret from the the Credentials tab. You can regenerate a new by clicking at the Regenerate button.
4. Requesting Access and Refresh Token
Let us now use new credentials and try OAuth authorization code flow. It is a two step process:
- Get the authorization code
- Use the code to get the access token and refresh token.
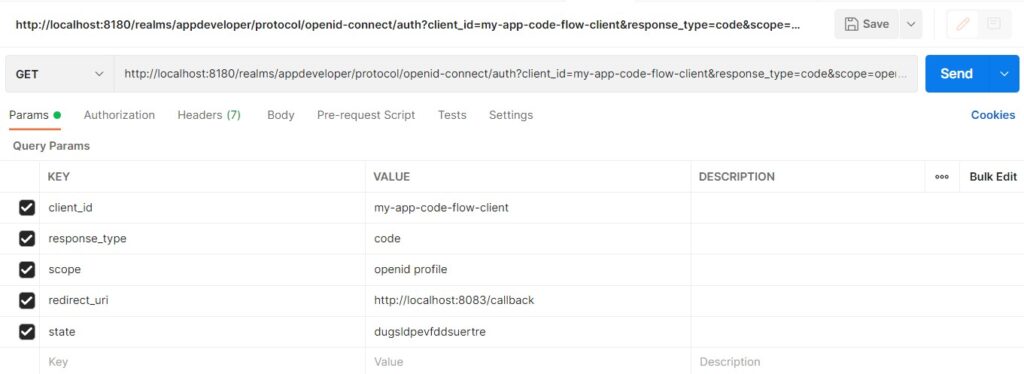
The URL to get code is a GET request. To create the URL, we’ll use the postman. You can create the URL manually without Postman also. We have provided the following values:
| client_id | my-app-code-flow-client |
| response_type | code |
| scope | openid profile |
| redirect_uri | https://localhost:8083/callback |
| state | dugsldpevfddsuertre |
This is shown in the following figure:
The generated URL is like the following:
https://localhost:8180/realms/appdeveloper/protocol/openid-connect/auth?client_id=my-app-code-flow-client&response_type=code&scope=openid profile&redirect_uri=https://localhost:8083/callback&state=dugsldpevfddsuertre
Access this URL in the browser. This will redirect to the login screen. Provide the Username and Password. Use the user name and password for the client my-app-code-flow-client to login.
After the successful login, you will be redirected to the callback URL. The URL in the address bar of the browser should be like this:
https://localhost:8083/callback?state=dugsldpevfddsuertre&session_state=0eec3712-801e-4623-8b8e-df971c8fc56c&iss=http%3A%2F%2Flocalhost%3A8180%2Frealms%2Fappdeveloper&code=bf26e088-bcc2-49a2-b079-058793224ddb.0eec3712-801e-4623-8b8e-df971c8fc56c.19066b0b-f612-4fcf-a308-73788e7889e7
This URL has the code in the end, code=bf26e088-bcc2-49a2-b079-058793224ddb.0eec3712-801e-4623-8b8e-df971c8fc56c.19066b0b-f612-4fcf-a308-73788e7889e7.
Let’s use this code to get the access token and refresh token. Use the value of header Content-Type as application/x-www-form-urlencoded.
POST https://localhost:8180/realms/appdeveloper/protocol/openid-connect/token
| grant_type | authorization_code |
| client_id | my-app-code-flow-client |
| client_secret | 4UidtWg9H03EX8qFdotqYGelKPW2NiVZ |
| code | bf26e088-bcc2-49a2-b079-058793224ddb.0eec3712-801e-4623-8b8e-df971c8fc56c.19066b0b-f612-4fcf-a308-73788e7889e7 |
| scope | openid profile |

The generated response is like the following:
{
    "access_token": "eyJhbGciOiJSUzI1NiIsInR5cCIgOiAiSldUIiwia2lkIiA6ICI0OUtoOVp4akFCYVFIVjNlZnpBZVVrRVFWQk9KeDlOSlNGY2luTHpRZkhzIn0.eyJleHAiOjE3MjY1MTA2MDcsImlhdCI6MTcyNjUxMDMwNywiYXV0aF90aW1lIjoxNzI2NTA5OTM2LCJqdGkiOiJjMzBiNGU1Yy03OTIwLTQ2YjgtOWZmYS05OWQ3ZTk3NTQyZWIiLCJpc3MiOiJodHRwOi8vbG9jYWxob3N0OjgxODAvcmVhbG1zL2FwcGRldmVsb3BlciIsImF1ZCI6ImFjY291bnQiLCJzdWIiOiJkNmFjOTE5ZS1kODcxLTQ5NjktYTBmMi05NDE2OTdhMTllYTkiLCJ0eXAiOiJCZWFyZXIiLCJhenAiOiJteS1hcHAtY29kZS1mbG93LWNsaWVudCIsInNpZCI6IjBlZWMzNzEyLTgwMWUtNDYyMy04YjhlLWRmOTcxYzhmYzU2YyIsImFjciI6IjAiLCJhbGxvd2VkLW9yaWdpbnMiOlsiKiJdLCJyZWFsbV9hY2Nlc3MiOnsicm9sZXMiOlsib2ZmbGluZV9hY2Nlc3MiLCJkZWZhdWx0LXJvbGVzLWFwcGRldmVsb3BlciIsInVtYV9hdXRob3JpemF0aW9uIl19LCJyZXNvdXJjZV9hY2Nlc3MiOnsiYWNjb3VudCI6eyJyb2xlcyI6WyJtYW5hZ2UtYWNjb3VudCIsIm1hbmFnZS1hY2NvdW50LWxpbmtzIiwidmlldy1wcm9maWxlIl19fSwic2NvcGUiOiJvcGVuaWQgcHJvZmlsZSBlbWFpbCIsImVtYWlsX3ZlcmlmaWVkIjpmYWxzZSwibmFtZSI6IlJvZ2VyIEphbWVzIiwicHJlZmVycmVkX3VzZXJuYW1lIjoicm9nZXIuamFtZXMiLCJnaXZlbl9uYW1lIjoiUm9nZXIiLCJmYW1pbHlfbmFtZSI6IkphbWVzIiwiZW1haWwiOiJyb2dlci5qYW1lc0BsZWFybml0d2ViLmNvbSJ9.KrK0uJunXW6tIqzCkFrV7T7742YI_tSjmXRkXpOmXHjO33DjA7a6Ot7UO2qCtr0Npb3qb9w1zTHMjUmXE1RFmu3LJ2S0Bew4xhOtra3DiPGvy3H7jCOIEkLCNoW3uUCbklfmC1vBKR2nAMDFT7HPGaCnVxxdyO_-WFZp0TJmmfzUuI6q8wFykdsmlYecpAJfvE5GGeECklj6nonbUPpJ423olY5Oop9OEUslDdjzEiNYWB0wAFhNAsEOvm47UQbjLqXvC5xpy3mhxu0f7qvknY36NxD8kE22Bv4rNThq80NvYq7LclPphmvRQzgYGhFuOUNOKSPaeRdsbiMhfHUMxg",
    "expires_in": 300,
    "refresh_expires_in": 1800,
    "refresh_token": "eyJhbGciOiJIUzUxMiIsInR5cCIgOiAiSldUIiwia2lkIiA6ICI4NzhiMjQ1Ny04ODU3LTQxOGUtODhlYS0wZmFmOTdiYmNkMjYifQ.eyJleHAiOjE3MjY1MTIxMDcsImlhdCI6MTcyNjUxMDMwNywianRpIjoiMDRiY2FiNjItMzRkZS00Y2VjLWJiNTYtMTBmMjdmOWQyYjFkIiwiaXNzIjoiaHR0cDovL2xvY2FsaG9zdDo4MTgwL3JlYWxtcy9hcHBkZXZlbG9wZXIiLCJhdWQiOiJodHRwOi8vbG9jYWxob3N0OjgxODAvcmVhbG1zL2FwcGRldmVsb3BlciIsInN1YiI6ImQ2YWM5MTllLWQ4NzEtNDk2OS1hMGYyLTk0MTY5N2ExOWVhOSIsInR5cCI6IlJlZnJlc2giLCJhenAiOiJteS1hcHAtY29kZS1mbG93LWNsaWVudCIsInNpZCI6IjBlZWMzNzEyLTgwMWUtNDYyMy04YjhlLWRmOTcxYzhmYzU2YyIsInNjb3BlIjoib3BlbmlkIHByb2ZpbGUgcm9sZXMgZW1haWwgYmFzaWMgYWNyIHdlYi1vcmlnaW5zIn0.bLNXksH3NnqdjCXzoFCg7djujLwVbt7m3XSFeQ0NWB2dIarGPZUXq2NoVrYDbWUbEVVxDC8CJwMLfkfkHsK2-w",
    "token_type": "Bearer",
    "id_token": "eyJhbGciOiJSUzI1NiIsInR5cCIgOiAiSldUIiwia2lkIiA6ICI0OUtoOVp4akFCYVFIVjNlZnpBZVVrRVFWQk9KeDlOSlNGY2luTHpRZkhzIn0.eyJleHAiOjE3MjY1MTA2MDcsImlhdCI6MTcyNjUxMDMwNywiYXV0aF90aW1lIjoxNzI2NTA5OTM2LCJqdGkiOiJmZmUyNDFiNS05MmU0LTRhMjgtOGQ4NC04NjllYjA1MzUwNGMiLCJpc3MiOiJodHRwOi8vbG9jYWxob3N0OjgxODAvcmVhbG1zL2FwcGRldmVsb3BlciIsImF1ZCI6Im15LWFwcC1jb2RlLWZsb3ctY2xpZW50Iiwic3ViIjoiZDZhYzkxOWUtZDg3MS00OTY5LWEwZjItOTQxNjk3YTE5ZWE5IiwidHlwIjoiSUQiLCJhenAiOiJteS1hcHAtY29kZS1mbG93LWNsaWVudCIsInNpZCI6IjBlZWMzNzEyLTgwMWUtNDYyMy04YjhlLWRmOTcxYzhmYzU2YyIsImF0X2hhc2giOiJVMWNiWnZ0UFdiSjRyYXF6a09zSDJBIiwiYWNyIjoiMCIsImVtYWlsX3ZlcmlmaWVkIjpmYWxzZSwibmFtZSI6IlJvZ2VyIEphbWVzIiwicHJlZmVycmVkX3VzZXJuYW1lIjoicm9nZXIuamFtZXMiLCJnaXZlbl9uYW1lIjoiUm9nZXIiLCJmYW1pbHlfbmFtZSI6IkphbWVzIiwiZW1haWwiOiJyb2dlci5qYW1lc0BsZWFybml0d2ViLmNvbSJ9.shnNXHIZDFqkNQWkua2hOc9rl0EgG9lLc_z7MfODhRdmmRYUwH5Stsbedo2TR9oKWDLitMpBeqEjdtylU3MmcAJLiyO7aWHkPZQtGqLTPPfa9wGgPvxYyZEnqjmGab1pwsYpkkRNu1v859ksnJ7ZohLtKY7gOCSKbEAEQOTUNunlPtDoImazwkQJYItQXTL2LOG31yOVotNPACDf9LI0siJm61Il2SYiH6igqfTC3fmo7rt8BAauAsYpu7eLE0wwnugx3Vxi8U9Hjy8oKyExZ1GC8tfK27TW1QPCNx-G5U2ujqM7MdY8UjtYROL3UCVf7svlsE92A-HGAm7Q6Zqa8A",
    "not-before-policy": 0,
    "session_state": "0eec3712-801e-4623-8b8e-df971c8fc56c",
    "scope": "openid profile email"
}
5. Enable/Disable OAuth 2.0 Authorization Flow
You can enable and disable a particular authentication flow from the Capability Config section for the client.
For the enhanced authorization code flow or PKCE, there is one more additional setting you need to enable. In the Advanced tab, in the Advanced settings section, there is a setting Proof Key for Code Exchange Code Challenge Method.
In Keycloak, the Code Challenge Method setting allows you to specify which transformation method is used to generate the code challenge from the code verifier. The available options are:
- plain: The code challenge is the same as the code verifier (this is less secure and should generally be avoided unless necessary for compatibility reasons). In simple terms, Code Verifier and Code Challenge are the same.
- S256: The code challenge is the SHA-256 hash of the code verifier (this is the recommended method and more secure).
6. OAuth 2.0 Client Scopes
In Keycloak, client scopes define a set of roles, claims, or other information that can be shared with clients as part of tokens (ID or access tokens) during an OAuth 2.0 flow. They are used to control and manage what data is included in the token issued to a particular client.
When it comes to Assigned type in client scopes, Keycloak has two main types of client scopes for a client:
- Default (or “default client scopes”)
- Optional (or “optional client scopes”)
6.1 Assigned Type in Client Scopes:
- Default:
- These scopes are automatically assigned to the client when a user authenticates and requests a token.
- Every time the client makes a request, the scopes marked as “default” will be included in the token, unless explicitly excluded by the client.
- For example, a scope related to user roles or specific claims (e.g., email, profile information) may be marked as default, and these claims will always be present in the token by default.
- Optional:
- These scopes are not automatically included when a user authenticates. Instead, the client has to explicitly request these scopes during the authorization request.
- If the client requests an optional scope (e.g., by specifying it in the
scopeparameter during the OAuth authorization request), Keycloak will include the information from that scope in the token. If the client does not request it, the scope will not be included. - Optional scopes allow clients to dynamically ask for specific permissions or information when needed.
6.2 Update Client Scopes
You can setup the client scopes for a particular client, through the ‘Client scopes’ tab as shown in the following figure:

You can also remove a scope from here. Once the client scope is removed, it means it is not supported.
There is a tab adjacent to the ‘Setup’ tab, ‘Evaluate’. You can use this tab to evaluate and preview the access token or ID token that is generated.

To try this, you need to first provide the user name. You can provide the additional scopes, for example ‘address’ in the ‘Scope parameter’ field. After providing the values click on the ‘Generate access token’.
7. Conclusion
In this tutorial, we walked through the process of creating a new OAuth client in Keycloak and how to request access and refresh tokens. By configuring the client in Keycloak, you now have the ability to securely authenticate and authorize users in your applications using OAuth 2.0.
We covered:
- Setting up a new client in Keycloak.
- Configuring essential client settings such as redirect URIs and allowed flows.
- Making requests to obtain both access and refresh tokens using client credentials and authorization code flows.
With this setup, you can now integrate OAuth into your applications, enabling secure communication and token-based access to your services. You can expand on this by adding custom scopes, roles, or integrating additional identity providers, tailoring the authentication process to meet the needs of your applications.