1. Introduction
Keycloak is an open-source identity and access management (IAM) solution designed for modern applications and services. It provides features such as single sign-on (SSO), user federation, identity brokering, and social login. Built on top of popular standards like OAuth 2.0, OpenID Connect, and SAML 2.0, Keycloak offers seamless integration with various applications, allowing organizations to manage authentication, authorization, and user identities centrally. It also supports features like role-based access control (RBAC), multi-factor authentication (MFA), and user self-service for password resets and account management. Keycloak is highly customizable, scalable, and well-suited for securing both on-premise and cloud-based systems.
With Keycloak you can add authentication to applications and secure services with minimum effort. There is no need to deal with storing users for authenticating users. Keycloak provides fine-grained authorization services as well. This enables you to control permissions for all your services directly from the Keycloak admin console, giving you the flexibility to create and enforce the specific policies that meet your requirements.
2. Download Keycloak
To run a standalone authorization server Keycloak in your local machine, you need to download the Keycloak server. In this tutorial, we’ll see how to run Keycloak on a Windows machine.
The link to download Keycloak at the time of writing this tutorial is https://www.keycloak.org/downloads.
Download the ZIP file for the server.
Extract the contents of the zip file. In our case, the folder location is D:\softwares\keycloak.
3. Run the Keycloak Server
To start the Keycloak server on Windows, navigate to the bin directory of the downloaded Keycloak server. In our case, this is D:\softwares\keycloak\keycloak-25.0.5\bin.
To start the Keycloak server in development mode. Execute the following command at the terminal.
> kc.bat start-devThis will start the keycloak server in development mode at the port 8080. If the port 8080 is already taken, pass a port number of your choice while starting server. For example:
> kc.bat start-dev --http-port=8180kc.bat accepts options and commands.
kc.bat [OPTIONS] [COMMAND]Options:
| -cf, –config-file <file> | Set the path to a configuration file. By default, configuration properties are read from the “keycloak.conf” file in the “conf” directory. |
| -h, –help | This help message. |
| -v, –verbose | Print out error details when running this command. |
| -V, –version | Show version information |
Commands:
| build | Creates a new and optimized server image. |
| start | Start the server. |
| start-dev | Start the server in development mode. |
| export | Export data from realms to a file or directory. |
| import | Import data from a directory or a file. |
| show-config | Print out the current configuration. |
After the server is started, you can access the Keycloak server at https://localhost:8180/. The page looks like the following:
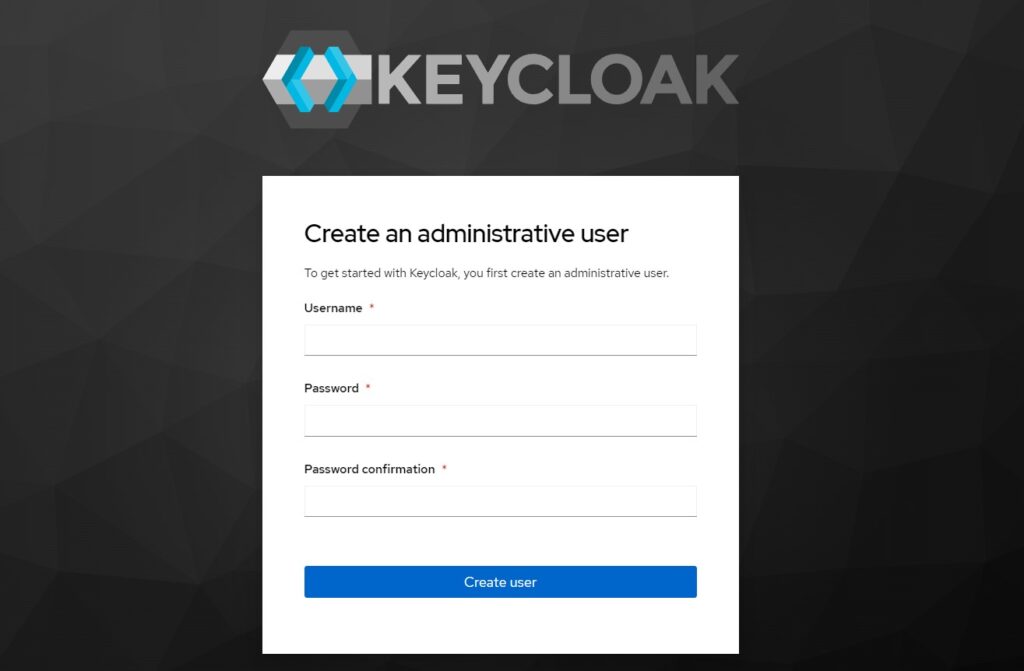
4. Creating an Admin User
When we start the Keycloak server for the first time there will be no default username and password that we can use to access the server. We will need to create an initial admin user to be able to log in.
Provide a username and password and confirm password and click ‘Create user’ button to create the user. The created user can be used to login to the Keycloak administrative console. Keep in mind that the credentials of this initial admin user should not be used by any client applications that we create and register with this server.
We will only need the initial admin user to log into the server for the first time in order to create a new realm, set up regular users, and register client applications.
Now that we have the initial admin user, in the upcoming tutorials we’ll create a new realm, add a new user, and then register a client application.
5. Conclusion
In this short tutorial, we saw how to download and start the Keycloak standalone server in local machine. With its powerful features and intuitive interface, Keycloak offers a comprehensive solution to streamline user management and access control, making it easier to integrate security into your services. You are now ready to explore more advanced configurations and tailor Keycloak to meet the specific needs of your projects.