1. Introduction
In this tutorial, we’ll learn how to configure a Spring Boot application as OAuth resource server.
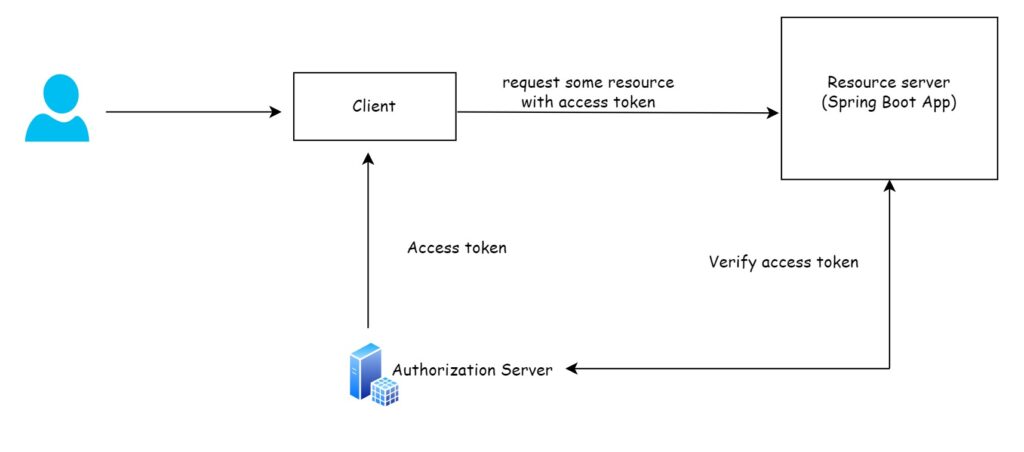
In the real world, the resource owner tries to access some information from the resource server. In this tutorial, the resource server is a Spring Boot application. The user tries to access a protected API endpoint. In this tutorial, we’ll access the endpoint using an access token.
The communication between the actors of the flow are shown in the following figure:

2. Create OAuth resource server
To create an application as the OAuth resource server, add the following dependency:
<dependency>
	<groupId>org.springframework.boot</groupId>
	<artifactId>spring-boot-starter-oauth2-resource-server</artifactId>
</dependency>
To enable client applications to communicate with our resource server, they must include a valid access token issued by the authorization server and configure our resource server to validate this access token. We need to add a specific property to our application’s properties file when configuring the authorization server.
spring.security.oauth2.resourceserver.jwt.issuer-uri=http://localhost:8080/realms/appdeveloper
This value of this property is the realm created in Keycloak. Spring security uses this property to discover the authorization service public keys and to validate the access token signature. The client application that was used to acquire an access token that has been validated must be registered with the Keycloak realm. Another way to configure resource server to validate the access token with the authorization server is to use the following property.
spring.security.oauth2.resourceserver.jwt.jwk-set-uri=http://localhost:8180/realms/appdeveloper/protocol/openid-connect/certs
The URI is pointing to the public key. You can try this URI in the browser and check. The JSON document contains the information that will be used to validate the access token.
3. Create a protected API
To represent a protected resource, we’ll create an API. This is a simple API for representation purpose only.
import org.springframework.web.bind.annotation.GetMapping;
import org.springframework.web.bind.annotation.RequestMapping;
import org.springframework.web.bind.annotation.RestController;

@RestController
@RequestMapping("/protected")
public class ProtectedController {
    @GetMapping("/hello")
    public String hello(){
        return "hello";
    }
}
To support this we’ll add following dependency in pom.xml.
<dependency>
	<groupId>org.springframework.boot</groupId>
	<artifactId>spring-boot-starter-web</artifactId>
</dependency>
4. Accessing endpoints with an access token
Now we will request an access token from our authorization server and then will use this access token to access the protected web service endpoint that our server exposes. Let’s first get the code. Following is the sample URL:
http://localhost:8180/realms/appdeveloper/protocol/openid-connect/auth?client_id=my-app-code-flow-client&response_type=code&scope=openid profile&redirect_uri=http://localhost:8083/callback&state=dugsldpevfddsuertret
Accessing this in the browser endpoint will redirect to the redirect URI in the browser. The endpoint should be something like the following:
http://localhost:8083/callback?state=dugsldpevfddsuertret&session_state=aef78c76-fd8d-43d3-a980-69fef053c193&iss=http%3A%2F%2Flocalhost%3A8180%2Frealms%2Fappdeveloper&code=2c71b483-8df9-4b62-b755-867ed8f722ff.aef78c76-fd8d-43d3-a980-69fef053c193.19066b0b-f612-4fcf-a308-73788e7889e7
Notice that this has the code in the end. We’ll use this code to get access token. The endpoint to get the same should be:
POST http://localhost:8180/realms/appdeveloper/protocol/openid-connect/token
Here, appdeveloper is our realm we created in our earlier tutorial. Following are the sample parameters and values in our request:
- grant_type: authorization_code
- client_id: my-app-code-flow-client
- client_secret: jj8p4fqHyE0l4bllahPsVFrTBtrgeJaR
- code: 2c71b483-8df9-4b62-b755-867ed8f722ff.aef78c76-fd8d-43d3-a980-69fef053c193.19066b0b-f612-4fcf-a308-73788e7889e7
- redirect_uri: http://localhost:8083/callback
- scope: openid profile
In the response we’ll get the access token. We’ll use this access token to access the protected API.
GET http:\localhost:8080/protected/hello
We are using POSTMAN for this example. The ‘Authorization’ is ‘Bearer Token’, the value of which is the access token retrieved in earlier in this tutorial.
The response should be message ‘hello’.
Now try changing the access token in the request. You should get the ‘401 Unauthorized’. If you get this it means the flow is working fine.
5. Accessing JWT token and claims
A JWT token holds a significant amount of information, and if you need to access this data within your code, there’s a method to do so. You can access the entire JWT token and any claims it contains. Let’s modify the /hello endpoint to return the JWT token.
@RestController
@RequestMapping("/protected")
public class ProtectedController {
    @GetMapping("/hello")
    public Jwt hello(@AuthenticationPrincipal Jwt jwt){
        //print JWT claims here
        return jwt;
    }
}
Here, we have used a special annotation @AuthenticationPrincipal. This annotation will bind the details of currently authenticated principal into a JWT object.
Now, if you try to access the endpoint /hello with a valid access token you will get the response similar to this:
{
    "tokenValue": "eyJhbGciOiJSUzI1NiIsInR5cCIgOiAiSldUIiwia2lkIiA6ICI0OUtoOVp4akFCYVFIVjNlZnpBZVVrRVFWQk9KeDlOSlNGY2luTHpRZkhzIn0.eyJleHAiOjE3MjY5MTI0NDYsImlhdCI6MTcyNjkxMjE0NiwiYXV0aF90aW1lIjoxNzI2OTEyMTExLCJqdGkiOiJlMzdkYzA2My00MDA2LTQ0OWMtOTUwZS1kZTdlZGEyZWExNTgiLCJpc3MiOiJodHRwOi8vbG9jYWxob3N0OjgxODAvcmVhbG1zL2FwcGRldmVsb3BlciIsImF1ZCI6ImFjY291bnQiLCJzdWIiOiJkNmFjOTE5ZS1kODcxLTQ5NjktYTBmMi05NDE2OTdhMTllYTkiLCJ0eXAiOiJCZWFyZXIiLCJhenAiOiJteS1hcHAtY29kZS1mbG93LWNsaWVudCIsInNpZCI6Ijg0MTgyM2NkLWQ4NmQtNDBiNC1iMjE4LTcxMWE1NzQzOTNiZCIsImFjciI6IjEiLCJhbGxvd2VkLW9yaWdpbnMiOlsiKiJdLCJyZWFsbV9hY2Nlc3MiOnsicm9sZXMiOlsib2ZmbGluZV9hY2Nlc3MiLCJkZWZhdWx0LXJvbGVzLWFwcGRldmVsb3BlciIsInVtYV9hdXRob3JpemF0aW9uIl19LCJyZXNvdXJjZV9hY2Nlc3MiOnsiYWNjb3VudCI6eyJyb2xlcyI6WyJtYW5hZ2UtYWNjb3VudCIsIm1hbmFnZS1hY2NvdW50LWxpbmtzIiwidmlldy1wcm9maWxlIl19fSwic2NvcGUiOiJvcGVuaWQgcHJvZmlsZSBlbWFpbCIsImVtYWlsX3ZlcmlmaWVkIjpmYWxzZSwibmFtZSI6IlJvZ2VyIEphbWVzIiwicHJlZmVycmVkX3VzZXJuYW1lIjoicm9nZXIuamFtZXMiLCJnaXZlbl9uYW1lIjoiUm9nZXIiLCJmYW1pbHlfbmFtZSI6IkphbWVzIiwiZW1haWwiOiJyb2dlci5qYW1lc0BsZWFybml0d2ViLmNvbSJ9.J4_vdfFqJFvqfuPRar6bfp4whE5zyMREBNIrmCsy_QtUX9OfHgFnaQSjBZ6C5-DqAAxJ4zek2q7TNW7a9WRJmkoYu-YnXaF5xdkN8DTDUFtHMnAsA-vOTbGpngJ6nlj3yNbdKLVBpbn8uUE9QCsYhwZrxGS37dK8_e80PbMfIp7K5jbyf3uXhL9q5xV75MwUEFsoT3Fj_pQgN2yByW6HVMQBJMQWTzXht4QGEp7GFdBF8AvSo8ne7yD-JSpzWNIFcZgNZ55HfQxJ3kR9XT7dLNzQPAf4vTfEe1r-Cz3jNOvVJYZyUWJcivDEDeqgY_FghYjIPwrpu7Stj6lIhFGtvQ",
    "issuedAt": "2024-09-21T09:49:06Z",
    "expiresAt": "2024-09-21T09:54:06Z",
    "headers": {
        "kid": "49Kh9ZxjABaQHV3efzAeUkEQVBOJx9NJSFcinLzQfHs",
        "typ": "JWT",
        "alg": "RS256"
    },
    "claims": {
        "sub": "d6ac919e-d871-4969-a0f2-941697a19ea9",
        "resource_access": {
            "account": {
                "roles": [
                    "manage-account",
                    "manage-account-links",
                    "view-profile"
                ]
            }
        },
        "email_verified": false,
        "allowed-origins": [
            "*"
        ],
        "iss": "http://localhost:8180/realms/appdeveloper",
        "typ": "Bearer",
        "preferred_username": "roger.james",
        "given_name": "Roger",
        "sid": "841823cd-d86d-40b4-b218-711a574393bd",
        "aud": [
            "account"
        ],
        "acr": "1",
        "realm_access": {
            "roles": [
                "offline_access",
                "default-roles-appdeveloper",
                "uma_authorization"
            ]
        },
        "azp": "my-app-code-flow-client",
        "auth_time": 1726912111,
        "scope": "openid profile email",
        "name": "Roger James",
        "exp": "2024-09-21T09:54:06Z",
        "iat": "2024-09-21T09:49:06Z",
        "family_name": "James",
        "jti": "e37dc063-4006-449c-950e-de7eda2ea158",
        "email": "roger.james@learnitweb.com"
    },
    "id": "e37dc063-4006-449c-950e-de7eda2ea158",
    "subject": "d6ac919e-d871-4969-a0f2-941697a19ea9",
    "issuer": "http://localhost:8180/realms/appdeveloper",
    "audience": [
        "account"
    ],
    "notBefore": null
}
6. Conclusion
In this tutorial, we created a resource server and tried end-to-end flow for accessing a protected resource. This tutorial is a very basic in setup. In production applications, the setup could be different but the concept and flow is the same as we discussed.
