1. Introduction
Scope is a feature in OAuth 2.0 that restricts an application’s access to a user’s account. Applications can request one or more scopes, which are shown to the user on the consent screen. The access token provided to the application is then limited to the scopes that the user approves.
For a client application to get a list of protected resource from the resource server, it will need to have an access token. The client application needs to send scope in the request. The request parameter can contain one more scopes that will specify the kind of information this client application would like to access.
In this tutorial, you’ll learn how to configure a specific web service endpoint in resource server to return information only if the provided access token contains a valid scope. If a web service endpoint does not contain the requested scope, then the request will be forbidden.
2. Requesting Claims using Scope Values
OpenID Connect Clients use scope values, to specify what access privileges are being requested for Access Tokens. The scopes associated with Access Tokens determine what resources will be available when they are used to access OAuth 2.0 protected endpoints. Protected Resource endpoints MAY perform different actions and return different information based on the scope values and other parameters used when requesting the presented Access Token.
OpenID Connect defines the following scope values that are used to request Claims:
- profile: This is OPTIONAL. This scope value requests access to the End-User’s default profile Claims, which are:
name,family_name,given_name,middle_name,nickname,preferred_username,profile,picture,website,gender,birthdate,zoneinfo,locale, andupdated_at. - email: This is OPTIONAL. This scope value requests access to the
emailandemail_verifiedClaims. - address: This is OPTIONAL. This scope value requests access to the
addressClaim. - phone: This is OPTIONAL. This scope value requests access to the
phone_numberandphone_number_verifiedClaims.
Multiple scope values MAY be used by creating a space-delimited, case-sensitive list of ASCII scope values. For example:
scope=openid profile email phone3. Configuring Bean to check profile
Following is the code in Spring:
import org.springframework.context.annotation.Bean;
import org.springframework.context.annotation.Configuration;
import org.springframework.http.HttpMethod;
import org.springframework.security.config.annotation.web.configuration.EnableWebSecurity;
import org.springframework.security.config.annotation.web.builders.HttpSecurity;
import org.springframework.security.oauth2.server.resource.authentication.JwtAuthenticationConverter;
import org.springframework.security.web.SecurityFilterChain;

@Configuration
@EnableWebSecurity
public class WebSecurity {

    @Bean
    public SecurityFilterChain securityFilterChain(HttpSecurity http) throws Exception {
        http
                .authorizeHttpRequests(authorize -> authorize
                        .requestMatchers(HttpMethod.GET, "/protected/hello").hasAuthority("SCOPE_profile")
                        .anyRequest().authenticated()
                )
                .oauth2ResourceServer(oauth2 -> oauth2
                        .jwt(jwt -> jwt
                                .jwtAuthenticationConverter(jwtAuthenticationConverter())
                        )
                );

        return http.build();
    }

    @Bean
    public JwtAuthenticationConverter jwtAuthenticationConverter() {
        JwtAuthenticationConverter converter = new JwtAuthenticationConverter();
        // Customize the converter if needed (e.g., setting authorities claim name)
        return converter;
    }
}
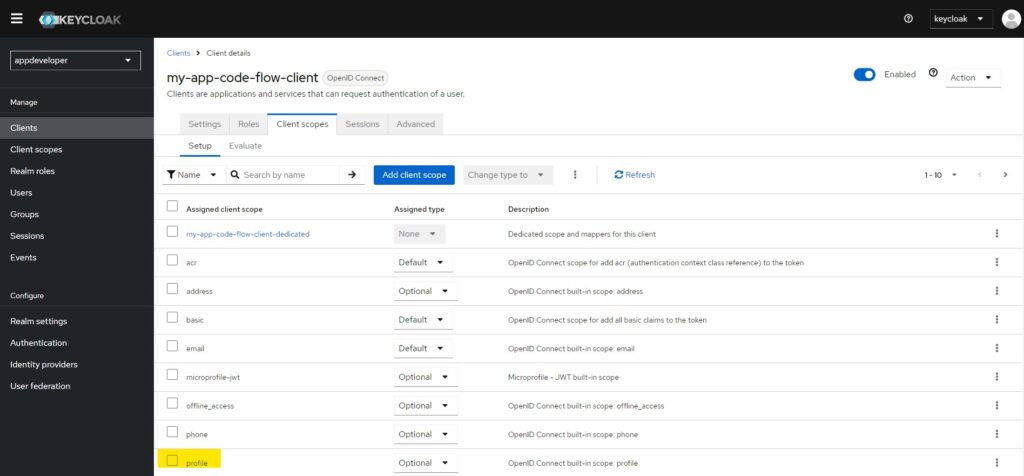
5. Client Scope Setting
To test we’ll make the scope profile as Optional. This will allow us to test our changes. If the value is Default profile will always be in the scopes. With Optional we can request it.
6. Test our changes
To test our changes, first you need to get the access token. Remember to remove the profile from the request. Now try to access localhost:8080/protected/hello. You should get 401 Unauthorized access.
Now try to get a new token with profile in the scope while accessing code and token. If you are able to access https://localhost:8080/protected/hello then this means our changes are working fine.
7. Conclusion
In this tutorial, we’ve explored how to implement scope-based access control in an OAuth 2.0 Resource Server. By leveraging scopes, you can fine-tune access control, ensuring that clients only have permissions necessary for their specific needs.
By using scope-based access control, you can enhance security and maintain a clean and organized approach to managing permissions within your application. This approach not only strengthens your application’s security but also aligns with best practices for managing access to protected resources in modern applications.