1. Introduction
In Java, a module is a unit of organization for Java code introduced in Java 9 as part of the Java Platform Module System (JPMS). It encapsulates a set of related packages and resources, providing a way to define dependencies and access controls between different parts of a Java application. Each module should compulsory contain a special configuration file: module-info.java.
2. Module declaration
A module is a uniquely named group of packages, as well as resources(such as XML files and images) and a module descriptor. The file for a module descriptor is called module-info.java.
To declare a module, we need to keep the file module-info.java at the root of our package. This file contains all the information related to our module.
The content of a module-info.java is like the following:
module myModuleName {
    // optional module information
}
The presence of module-info.java informs the Java compiler that we are working with a module rather than plain Java sources. The module descriptor must be present in the root of the module directory. module-info.java is compiled along with the other source files into a binary class-file called moduleinfo.class.
The name must match the name of the directory containing the module descriptor, otherwise the code will not compile. This name-matching requirement is true only when running the compiler in multimodule mode. For the single-module scenario, this requirement is not applicable.
A module declaration starts with the word module which is followed by the name of the module. However, it is valid to have an empty body in the module descriptor, but we’ll generally need more information to be provided in module descriptor.
module my.module {
	requires required.package.name;
	exports exported.package.name;
}
The module my.module has a dependency of module required.package.name. The dependency of a module is indicated by the requires keyword.
The module my.module exports exported.package.name package to other modules. Only when a package is explicitly exported from a module, it can be accessed by other modules. Packages that are not explicitly exported by a module are not accessible from other modules by default.
An empty module declaration body means nothing is exported to other modules.
Note: The module keyword is a restricted keyword. It is treated as a keyword only inside module-info.java. The same is true for other module related terms like requires. The module-info.java is not a legal Java identifier because it contains a dash. This was done intentionally to separate this file from other regular Java files.
Running the compilation of files with module-info.java results in generation of class files organized in certain structure which is known as ‘exploded module’ format. The module system takes the name of the module from the descriptor, not from the directory name.
No error is throws when multiple modules with the same name are in different directories on the module path. In such case, the first module is selected and subsequent modules with the same name are ignored.
3. Module in global namespace
Module live in a global namespace. This namespace is similar to other namespaces in Java. So, theoretically, you could give a module the same name as a class, interface, or package. But in its namespace, module names must be unique. You can use the same convention of naming packages to give your modules unique name, for example, reverse DNS notation (com.learnitweb.controller).
4. The ‘requires’
The first module statement which we’ll discuss is requires. The requires allows us to declare the dependency of a module. For example:
module learnitweb.module {
    requires module.name;
}
In this example, learnitweb.module module has a compile-time and run-time dependency on module.name. This also means, all public types exported from module.name will be accessible to learnitweb.module.
Important points to note
- We cannot use same
requiresdirective for multiple modules. So following is an invalid:
requires moduleA,moduleB; - We can use
requiresdirective only for modules but not for packages and classes.
5. exports directive
The exports directive is used by a module to specify the module(s) exported by current module to other modules.
module moduleA {
	exports pack1;
}
This example states that the moduleA exports package pack1 so that pack1 can be used by other modules.
Note: We cannot use same exports directive for exporting multiple packages. For every package a separate exports directive must be required.
6. Qualified exports
In some cases, you may want to expose a package only to certain other modules. You can achieve this by using ‘qualified exports’ in the module descriptor. Let us understand this with the help of an example.
module mymodule {
	exports package1; // exports package 1 to all
	exports package2 to module1; // exports package2 only to module1
	exports package3 to module2,module3; //exports package3 to module2 and module3
}
In this example, mymodule exposes package1 to all. The package2 is exported to module1 only. The package3 is exported to module2 and module3. The exported package is only accessible only by the modules specified after to. If you want to expose a package to multiple modules, you can specify the module names separated by comma. Any module not mentioned after the to will not be able to access types in the package, even when they read the module.
You should avoid using qualified exports. Using qualified exports creates a tight bond between the module exposing package and the consuming module. The reason is that we have to specify the name of the consumer module in the module descriptor. This is an undesired behavior.
7. Java module example in Intellij
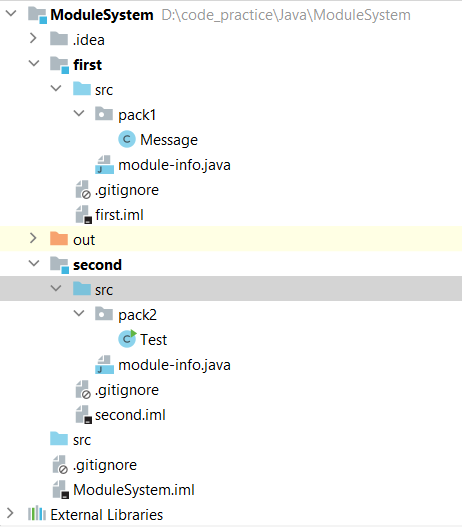
In this example, there are two modules first and second. The module first exports package pack1. The second module requires pack1.
module first{
    exports pack1;
}
module second {
requires first;
}Following is the code of Message.java
package pack1;

public class Message {
    public void hello(){
        System.out.println("Hello");
    }
}
Following is the code of Test.java which uses Message to call the method hello(). Message is in package pack1 exported from module first.
package pack2;

import pack1.Message;

public class Test {
    public static void main(String[] args){
        Message message = new Message();
        message.hello();
    }
}
8. Module example with command line
Earlier module example was using IDE Intellij. Let us now see an example by writing a simple program, compiling and running at command line.
Following is the file structure:
D:.
└───moduleA
    │   module-info.java
    │
    └───pack1
            Test.java
Here Test.java is a simple Java program.
package pack1;
public class Test {
	public static void main(String[] args) {
		System.out.println("Java module example");
	}
}
The module-info.java is simple with no requires and exports.
module moduleA {
}
8.1 Compiling a module
Following are possible ways to compile the module:
- javac –module-source-path src -d out -m moduleA
- javac –module-source-path src -d out –module moduleA
- javac –module-source-path src -d out src/moduleA/module-info.java src/moduleA/pack1/Test.java
Here out is the output directory where class files are generated.
8.2 Running the compiled module
Following are possible ways to run the compiled module:
- java –module-path out –add-modules moduleA pack1.Test
- java –module-path out -m moduleA/pack1.Test
- java –module-path out –module moduleA/pack1.Test
8.3 Compile modules in different directories
Suppose there are two modules moduleA and moduleB present in source directories src and src2 respectively. These can be compiled in the following way:
javac --module-source-path src;src2 -d out -m moduleA, moduleB8.4 Run the program if compiled code is available in different directories
Suppose that compiled code of moduleA is present in src and compiled code moduleB is present in moduleB. We can use option --upgrade-module-path to run the executed code.
java --upgrade-module-path out;out1 -m moduleB/pack2.Test9. Using the modular JDK without modules
Since Java 9, JDK is modularized. Let us discuss what will happen if your code is not yet modularized.
Let us understand this with the help of an example.
import java.util.logging.Level;
import java.util.logging.Logger;
import java.util.logging.LogRecord;

public class DefaultModule {
    public static void main(String... args) {
        Logger logger = Logger.getGlobal();
        LogRecord message = new LogRecord(Level.INFO, "Hello World!!");
        logger.log(message);
    }
}
The class DefaultModule is not declared in any module. But this class uses java.logging module in the JDK. This is valid code and complies without any error. Code written outside any module lands in the unnamed module. Whenever a module is specified for type then that type lands in an explicit module. The module-info.java file specifies the name of the module in which the type ends up.
- An
unnamed moduleis a special module which can read all other modules. - The concept of
classpathis still there in Java 9. It is not recommended to useunnamed moduleas we do not get any of the benefits of using module system. You are responsible for constructing the correctclasspathin Java 9 when working withunnamed module. - Since Java 9, JDK is modularized. It strongly encapsulates internal implementation classes. With Java 9, you cannot compile against encapsulated types in platform modules. To aid migration of code compiled on earlier versions of Java using these internal APIs continues to run on the JDK 9 classpath for now.
- When running an application on the JDK 9 classpath, a lenient form of strong encapsulation is activated.
- When compiling in the
unnamed module,java.seis taken as the root module during compilation. So you can access types which are reachable throughjava.se.
10. Conclusion
Throughout the tutorial, we learned the fundamental concepts of modules, including module declaration, dependencies, and exports. We saw how to create modules, define their dependencies, and use them to organize code effectively.