1. Introduction
This tutorial can act as a starting point if you are starting Spring Boot. In this tutorial, we’ll create a very simple application in Spring Boot. We’ll create a simple REST service which returns a message “Hello World”.
To create REST service, we’ll use start.spring.io. There are other ways to create a Spring Boot application as well but using start.spring.io is very simple. It has a very easy to use interface. It generates application for us which can be imported in the IDE like Eclipse and STS.
2. Bootstrap our first application
- Go to https://start.spring.io/.
- The page will look like the following but it could be different depending on when you access the application. Provide the values for the fields as shown below. For the dependencies, provide
Spring Web.
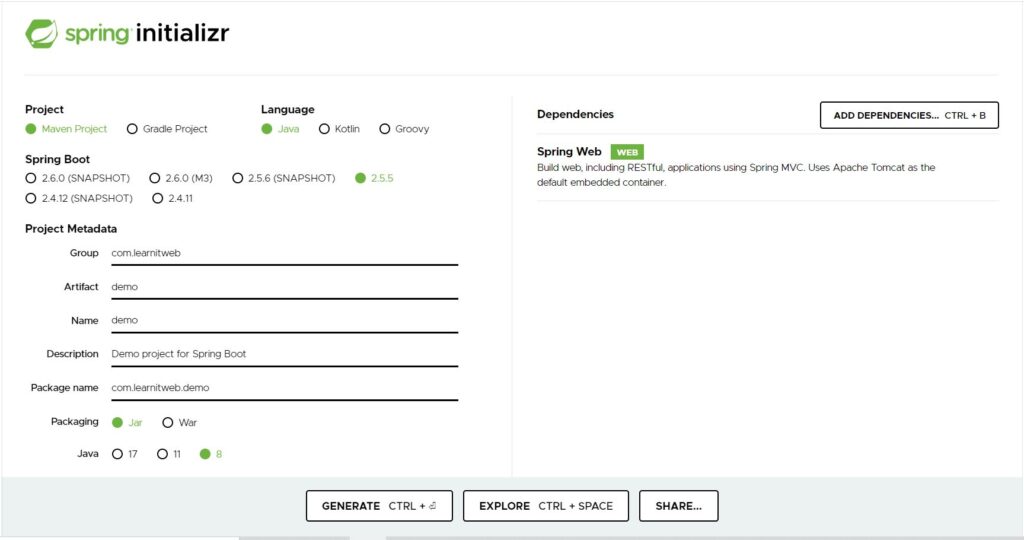
- Click on Generate. This will generate file
demo.zipfile. Download it and extract the contents. This is our application code. - We’ll use Spring Tool Suite to see the developed code. Open STS and import the project.
- We have created our first application and we can run it. Let us now add a REST controller. Create the class
HelloWorldController.java.
package com.learnitweb.demo.controller;

import org.springframework.web.bind.annotation.GetMapping;
import org.springframework.web.bind.annotation.RestController;

@RestController
public class HelloWorldController {
	@GetMapping("/hello")
	public String getHelloWorld() {
		return "hello World!!";
	}
}
- Run the application: Right click the Project > Run as > Spring Boot App. This will start the application. We’ll see message something like the following in console:
Started DemoApplication in 2.368 seconds (JVM running for 3.637).- Open browser and check the URL : https://localhost:8080/hello
3. Points to note about our first application
- We have generated a Maven project. Every Maven project has a certain structure in which project files are arranged. Observe the structure of project.
- Two important files to observe in code are
DemoApplication.javaandpom.xml. - Have a look at pom.xml. Check
dependenciesand theparentmentioned inpom.xml.
	<parent>
		<groupId>org.springframework.boot</groupId>
		<artifactId>spring-boot-starter-parent</artifactId>
		<version>2.5.5</version>
		<relativePath/> <!-- lookup parent from repository -->
	</parent>

	<dependencies>
		<dependency>
			<groupId>org.springframework.boot</groupId>
			<artifactId>spring-boot-starter-web</artifactId>
		</dependency>

		<dependency>
			<groupId>org.springframework.boot</groupId>
			<artifactId>spring-boot-starter-test</artifactId>
			<scope>test</scope>
		</dependency>
	</dependencies>
Notice that we have mentioned only these two dependencies and all the required dependencies will be downloaded. To check the downloaded dependencies, look for Maven Dependencies under the project.
We can create the project without using https://start.spring.io/. We can create the same folder structure and write the code ourselves. We can also use CLI to generate the project.
4. The “main” method
The code of main method looks like this:
import org.springframework.boot.SpringApplication;
import org.springframework.boot.autoconfigure.SpringBootApplication;

@SpringBootApplication
public class DemoApplication {

	public static void main(String[] args) {
		SpringApplication.run(DemoApplication.class, args);
	}
}
This is a standard method like any other Java application which acts as an entry point of the application. Our application bootstraps by calling run method of SpringApplication class. The argument to this method is DemoApplication.class which is the primary Spring component. The args array in the arguments refers to any command-line arguments.
If the default SpringApplication doesn’t suit your need, you can create a new instance and customize it. For example, to disable the banner printed at application startup you can write the code like this.
@SpringBootApplication
public class MyApplication {

    public static void main(String[] args) {
        SpringApplication application = new SpringApplication(MyApplication.class);
        application.setBannerMode(Banner.Mode.OFF);
        application.run(args);
    }

}
5. Create an Executable Jar of Spring Boot application
To create an executable jar, we need to add the spring-boot-maven-plugin to our pom.xml.
	<build>
		<plugins>
			<plugin>
				<groupId>org.springframework.boot</groupId>
				<artifactId>spring-boot-maven-plugin</artifactId>
			</plugin>
		</plugins>
	</build>
To generate an Executable Jar, run mvn package on command line.
> mvn packageIf you are using IDE (STS) in our case, right click the project > Run as > Maven install to generate executable jar.
The executable jar is generated in target folder.
We can run the self-contained executable jar file in production. This jar file includes our compiled class files along with all the dependencies required by our application.
6. How to run Spring Boot executable jar
Run the following from the command line to run Spring Boot executable jar
> java -jar <jar-file-name>7. Few other points about Spring Boot application
- When there is no package declaration, the class is considered to be in “default” package. The use of “default” package should be avoided while writing your class files. Annotations related to code scan like
@ComponentScan,@ConfigurationPropertiesScanand@EntityScancan cause problems while working with default packages. - It is recommended to write main class in the root package above other classes.
@SpringBootApplicationannotation is usually placed on main class. This annotation implicitly defines the base search package.- We can use
@EnableAutoConfigurationand@ComponentScanannotation if we don’t want to use@SpringBootApplication.
8. Conclusion
We created our first application. The target should be to create the application, run it and look at the code. We’ll discuss about the application and it parts in the upcoming tutorials.