1. Introduction
Whenever Spring Boot application is started, a banner is printed. The banner looks like the following:
  .   ____          _            __ _ _
 /\\ / ___'_ __ _ _(_)_ __  __ _ \ \ \ \
( ( )\___ | '_ | '_| | '_ \/ _` | \ \ \ \
 \\/  ___)| |_)| | | | | || (_| |  ) ) ) )
  '  |____| .__|_| |_|_| |_\__, | / / / /
 =========|_|==============|___/=/_/_/_/
 :: Spring Boot ::                (v2.6.0)
This startup banner can be customized. We can use custom text as well as image.
2. How to customize banner in Spring Boot?
There are two ways to change the banner:
- Adding
banner.txtfile in classpath. In Spring Boot project,banner.txt filecan be placed insrc/main/resources. The filebanner.txtcontains the banner to be displayed. - Setting
spring.banner.locationproperty to the location of banner file.
3. Using image as a banner
An image file can also be used as a banner by following two ways:
- Adding a
banner.gif,banner.jpg, orbanner.pngimage file to your classpath. In Spring Boot project, image file can be placed insrc/main/resources. The filebanner.txtcontains the banner to be displayed. - Setting
spring.banner.image.locationproperty to the location of the banner image.
It is recommended to use text file as banner because images are converted into an ASCII art representation and printed above any text banner. If a complex and large image is used, the startup time of application may increase.
4. Placeholders in banner.txt
The banner.txt file can contain certain placeholders. These placeholders represent specific information which you may want to print.
| ${application.version} | The version number of your application, as declared in MANIFEST.MF. |
| ${application.formatted-version} | The version number of your application, as declared in MANIFEST.MF. The value is formatted for display, enclosed within brackets and prefixed with v. For example (v2.1). |
| ${spring-boot.version} | The Spring Boot version. |
| ${spring-boot.formatted-version} | The Spring Boot version, formatted for display, enclosed within brackets and prefixed with v. For example, (2.6.1). |
| ${Ansi.NAME} (or ${AnsiColor.NAME}, ${AnsiBackground.NAME}, ${AnsiStyle.NAME}) | Here, NAME is the name of ANSI escape code. For example, ${Ansi.RED}. |
| ${application.title} | Application title as specified in MANIFEST.MF. |
5. Example of custom banner in Spring Boot
Create banner.txt file having following content and place in resources folder of your Spring Boot application.
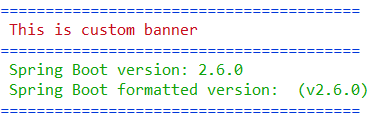
${Ansi.BLUE}========================================
${Ansi.RED} This is custom banner
${Ansi.BLUE}========================================
${Ansi.GREEN} Spring Boot version: ${spring-boot.version}
${Ansi.GREEN} Spring Boot formatted version: ${spring-boot.formatted-version}
${Ansi.BLUE}========================================
When the application is started the output would look like the following:
6. Other properties for banner
There are few other properties related to banner.
| Name | Description | Default Value |
| spring.banner.charset | Banner file encoding | UTF-8 |
| spring.banner.image.bitdepth | Bit depth to use for ANSI colors. Supported values are 4 or 8. | 4 |
| spring.banner.image.height | Height of the banner image in chars | |
| spring.banner.image.invert | Whether images should be inverted for dark terminal themes. | false |
| spring.banner.image.margin | Left hand image margin in chars. | 2 |
| spring.banner.image.pixelmode | Pixel mode to use when rendering the image. | TEXT |
| spring.banner.image.width | Width of the banner image in chars. | 76 |
There is one property
spring.main.banner-modewhich can have value as console, log or off. These values mean you want to show banner on System.out, configured logger or not show at all.
7. Conclusion
In this tutorial, we discussed how to customize banner in Spring Boot and how to use placeholders in banner. The custom banner is used when you want to show your product information when you ship your product.